Wednesday 28 April 2010

MORE MENS CARDS - WEDNESDAY 4TH MAY

SPACES AVAILABLE!!!!
Just to let you all know that Di's class "More Mens Cards" on 4th May has spaces available. So if you fancy making cards for the men in your lives give the shop a a ring on 01268 730234 and book yourself a place. The class is in the morning and will run from 10.00am until 12.30pm approx, no need to bring anything, everything will be provided including tea and biscuits!!
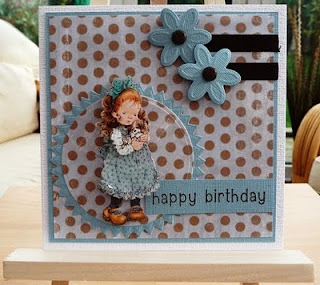
Just so that you know what you will be making .... the pictures of the cards are below
Go on book it ..... you know you want to!!


Saturday 24 April 2010

TUTORIALS - SIX PETAL ROSE

Hello everyone!! What a gorgeous day!! Makes you think of lovely flowers so this tutorial seems very appropriate.

Our very own Di has just emailed me the instructions to make this beautiful 6 petal rose using the blue 2" Woodware flower punch. So sit back ..... relax .... read the instructions ..... and enjoy making this wonderful embellishment for your cards.


Gather your supplies together - you will need a six petal paper punch, PVA glue, ink pad, finger dauber, scissors, tweezers, pokey tool, glossy accents, paper or light-weight card i.e. Bazzill Basics


Start by punching out 3 flowers and ink the edges of the petals using the dauber (if the other side of your paper/card is white you can also ink that as well to give it some colour)


Fold each flower between the petals and crease with your fingers


Snip along the crease of one of the flower segments to the centre.  On the second flower snip out one whole segment.  The third flower snip out two segments


Spread a little PVA glue on a petal then overlap it on top of the one next to it.  Repeat this for each of the three large flowers


Take each flower segment and roll the petal outwards


Curl the two smaller segments of the petals inwards


Snip a bit of the centre points from each piece so the flower won't stack up like a pyramid


Dab some PVA glue around the second largest segment and set it into the largest.  Repeat with each one using tweezers to help position and let it dry


When flower is assembled and dry add some glossy accents to a few petals to make it look like dew


And here they are!!
3 finished flowers, assembled and added to a beautiful card - aren't they brilliant!!!
To make this card Di has used -
Caramello Cuttlebug Folder
Woodware Clear Stamp Set - Mary & Friends
Circle and Scallop Circle Nestabilities

Thanks so much Di for sharing your tutorial with us - we hope you all enjoy making them.
Don't forget you can make them bigger or smaller depending on the size of punch you use - you just need to remember to make sure it has 6 petals

Click Here to pop over to Di's personal blog and have a look at all her lovely cards :o)

Thanks for taking the time to look and please leave a comment and let us know what you think, and if these tutorials are helpful to you
xxx

Sunday 18 April 2010

TUTORIALS - EASEL CARD

Hi everyone!!
I was just sitting here on this lovely sunny Sunday afternoon and thought I would show you another shaped card - an Easel Card.  This shape is really popular at the moment and so easy to achieve.  Use can use any size card but I find the best size cards to use are either a square, A5 or 7x5. I'm going to show you below how to do a square one.

First of all I gathered all my bits and pieces that I wanted to use together
I used a new toppers set we have in stock from Kanban which gives you an A4 backing card along with various toppers and tags plus other bits and pieces

I cut the A4 card down so that I had a 144mm x 288mm square card base
 
 I then folded it in half and scored the crease and then folded the front of the card back on itself and scored it to give the easel shape

Thats the basic shape of the card done - now its the fun part!!

Using a small cuttlebug folder I embossed "Its a Girl"
Then using low tack tape I taped the nestie shape - cutting side down - on top of the embossed wording so that I could get it exactly in the middle.
I then cut it on the Cuttlebug - using A Plate, C Plate, nestie - cutting side upwards and card face downwards and then B Plate

Once it was cut, I then embossed it using A Plate, B Plate, Nestie - cutting side upward with card on top, tan mat, shims of card and B Plate

I then left it in the nestie but turned it over so that the embossed side is facing you.  I then inked it using Lulu Lavender memento ink and a finger dauber (this enbables you to ink the inside of the embossed cirle, leaving you a white border).

Using the piece of card that was left over after I cut down the A4 piece of card I cut a scallop circle to mat my embossed wording onto and used the rest of it to mat and layer on the front of my easel card


It was then just a case of putting my card together


As you can see by raising the circles on foam pads it creates a stopper for your easel.  You could use all sorts of things from buttons to brads and any sort of sentiment raised on pads.
The card then lays flat inside the envelope for posting.

Go on have a go - its really easy and very effective.
Lots of Love :)

Thursday 15 April 2010

APRIL SKETCH CHALLENGE

Helloo Everyone!!!

Here it is ......the April Sketch Challenge :)
This is now the fourth challenge so you have an idea of how it works - stick to the basic design but you can resize or rotate the sketch, just use your imagination and see how your card ends up.
This month we are giving away a stash of goodies


If you have a blog, just post your card on your blog, leave me a comment and a link to your blog post (not just your blog) and we will pop over a have a look
If you don't have a blog you can email me a picture of your card at lindasalmon826@btinternet.com and finally if you live locally you can pop your card into the shop and enter that way.
The Challenge will end on 14th May and I will randomly pick a winner - (unfortunately we are only able to post the prize to the UK) but you are all more than welcome to play along.

Have Fun!!!!


Here is what our Design Team came up with


Designed By Di Cox
(Click Here to visit Di's personal blog)
Di has used -
Penny Black Stamp coloured with Promarkers
Blossom 2 Nestabilities
Basic Grey - Green at Heart DP

Designed by Janice Rohde
Janice has used -
Blossom 1 nestabilities
Cuttlebug "dogs" embossing folder
Embossing Borders
Cuttlebug Scribble Flowers


Designed By Laura Barton
Laura has used -
Pepper & Friends Stamp Set
Rose Garden DP
Circle and Scallop Circle Punches


Designed by Lynne Salmon
(Click Here to visit Lynne's personal blog)
Lynne has used -
My Minds Eye DP
Sarah Kay die cut decoupage
Circle and Pinking Circle Nestabilities
Creatables cut n emboss flowers


Designed by Michelle Wright
Michelle has used -
Nellies cut n emboss frames
Sarah Kay die cut decoupage
Creatable cut n emboss flowers
sizzix swirls

Designed by Réne Young
Réne has used -
Cuttlebug embossing folder
Sarah Kay die cut decoupage
Circle Punch
Nellies Eastern Rectangle
punched flowers and leaves


Designed by Sally Humphrey
Sally has used -
Printed Image from Jayne Netley Mayhew CD Rom
Nellies die cut circle frame
Buzzcraft greeting
Flowers & Gems - Papermania

Designed by Sharon Press
(Click Here to visit Sharon's personal blog)
Sharon has used -
Creative Expressions Butterfly 2 unmounted stamp set coloured with Promarkers
Petite Scallop Circles Nestabilities
Quickutz Nesting Circles Cookie Cutter

Good Luck to you all and most of all have fun!! :)

Monday 12 April 2010

BLOG CANDY WINNER!!!

Sorry its late in the day to post the winner of the blog candy but as you can see below we were all out busy playing today!!
I'd just like to say a big thank you to everyone who took part in our candy giveaway and for all your lovely comments and I can now announce that the winner is .....................

LINDY LOO!!!

Can you please email me at lindasalmon826@btinternet.com with your details and I can get your candy posted to you asap.

Thanks again for taking part - and dont forget to look out on Thursday this week as I will be uploading the new sketch challenge
Lots of Love :)

ALL DAY WORKSHOP

Well I’m a bit tired and worn out but it’s a good tired and worn out – today Réne, Di and me went on an all day workshop at Creative Expressions and had a great time!! We were lucky enough to do two workshops with Carol and two workshops with Sheena and learnt all sorts about embossing with metal, alcohol inks, distress inks, cosmic shimmers and grungeboard to name but a few!! We came home with some lovely bits and pieces so when you are in the shop ask us and we will show you what we did.

Such Concentration!!

Hard at Work


Thursday 8 April 2010

SOMETHING NEW!!!

Over the course of the coming months I am aiming to upload “Tutorials” for you. You’ve probably seen similar things either on the t.v., other websites or blogs or in magazines – and so have I – but i’m hoping it’s something you can refer to for inspiration, for something different, a new technique you haven’t tried before or simply something you can’t quite get your head around and need a “step by step guide” – the hope is that they will be helpful and you will gain some form of knowledge from them. I don’t profess to know everything and there may be other ways of doing these things but this is how I do them so I’m passing on what i’ve learnt to you. Hope you enjoy them!! :) XX

TUTORIALS - MOUNTAIN/VALLEY FOLD CARD

So ..... here’s the first one!!


I’m not actually sure that it’s called a Mountain/Valley Fold card but it’s what it reminds me of when I look at it so that’s what I called it. It’s a very simple fold but gives you a different look and will fit into a DL envelope for posting.

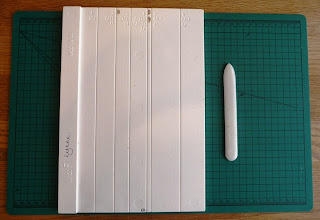
You need to start with an A4 sheet of card, a score board and bone folder


Place the short edge of the card up against the left hand side of the score board and score on the A5 gatefold line and the A4 zig zag or DL line


Turn the card around so the other short edge is against the left hand side of the score board and score on the A4 zig zag or DL line again - this will give you three score lines


(if you look closely i've numbered my score board 1,2 and 3 so that I remember which lines to use)

You then need to fold your card so that you have, what I call, two mountains and a valley, one mountain being taller than the other


Then, gather all your papers, tools and bits and pieces you will need to make your card


This is the fun part where your imagination can run riot, all there is to do now is to make up your card with your chosen papers, stamps and embellishments.


And there you are!!

The goodies I used are as follows :-
Basic Grey Urban Prairie - Bountiful 12x12 paper
Dotty Bazzill - Slipper
Petaloo Flowers
Memento Ink - Rosebud
Hobby Art Clear Stamp Set - General Greetings
Circles and Scallop Cirlces Nestabilities
All supplies can be purchased at In2Crafting by clicking here (subject to availability)

I've used a magnolia stamp but I have also entered this card into a challenge via my personal blog (if you want to be nosy click here)

I hope I have given you some inspiration and if you have a go and live locally bring your card into the shop and show me i'd love to see it - if you have a blog leave me a comment with a link to your post and i'll pop over and have a look - I really would love to see what you do with yours
Lots of Love xx