Showing posts with label TUTORIALS. Show all posts

Saturday, 3 December 2011

Letraset Metallic pens and some quick and easy cards

New in the shop are the packs of Metallic Markers set 1 from Letraset at £11.59 a set, if you are a Promarker or Aquamarker fan you will love these pens!! The pens are slightly different in that the nibs are a fine and medium size.


They are waterbased not alcohol based like the Promarkers so you cant blend them together but you can blend them with water. Six fab colours....

I have been having a little play and here's a great technique to make backgrounds for some quick and easy last minute Christmas cards.

You will need: a heat resist craft mat, some glossy cardstock, circle punches, spritzer bottle with some water in, heat gun, Black Adirondak or Stazon ink pad, Glitter gel pen, ruler { with nice smooth edges} stamps. I used the Paula Pascual Joyful Bubbles and Christmas Messages


Firstly, take some of the Pens...I used 3 colours the blue, violet and green and literally scribble them in a small area on your mat, then repeat with the other two colours. Take your water spritzer and spray some water over the ink, you don't need too much.


 Then take your glossy cardstock and lay glossy side down into the mat. I found if I moved it around too much I got a muddier look, which I did not like as much, so just press down firmly and then peel back. You can see the ink drying but I gave it a blitz with my heat gun to stop it dripping. The card will bend, don't worry it will straighten when cool.


To make the card I used circle punches to punch out 3 circles, then used the next size up circle punch to make a mat in black card.  You can use whatever size punches you have or if you have a circle cutter or circle Nestabilities, they would work just as well.  I stamped the "J" and "Y" on 1st and 3rd one and a snowflake and circle on the middle one. Stick the two layers together, I cut a rectangle of white card slightly smaller than the width of my prescored card stamped the little caps from Paula Joyful Bubbles set just above where I wanted the baubles to sit. Mat with some more Black card and before you stick down, take a ruler and run the Silver pen along the edge of the ruler to make a border, repeat on all sides keeping it even depth all the way around. I stamped the "to the world" sentiment, which comes in the kit but you can choose whatever sentiment you want. To do the bottom, I stuck a strip of double sided tape across the card, remove the top and sprinkle with silver glitter, firmed down with finger. I then scored a line above and below with a score board. Finally, a gem and some elastic cord for bows as a finishing touch.


Here's another version, same technique but I used the swirl stamp in the Christmas Messages set to stamp all over the circles and then drew a line with the Silver pen,  the lighter the pressure the thinner the line. I attached with foam pads and run some lines of a glitter gel pen around the swirls to add some twinkle.

Hope you like playing with your pens, definitely something to ask Father Christmas for!!! Have a great weekend, don't forget you save 20% off your shopping at the till today in the shop and you still get your points as well if you are a Privileged Cardholder. So you get 27.5% savings in total!!!

Everything is included (except gift vouchers, special orders and payment for workshops). Even already reduced price stock is included! So come and make some savings, get some crafting stock or a present for someone. There will be demos showing a stamping, colouring and glittering technique at various times during the day between 10 - 1 and 2 - 4.    Parking is free on Saturday - just outside our door.

Hot news.......just in individual Flexi markers in 52 colours just being put out in shop £2.95 each, so if you have been looking for more colours to fit in with your Promarkers, these work really well together!!

Jackie

Thursday, 17 June 2010

JUST A REMINDER

Hi everyone!!
Just a quick posting ... First of all just to remind you about the Demo Day this Saturday - come along if you can - Lynne Gilbert will be here showing all sorts of techniques and inspiration using cosmic shimmers, new unmounted stamp sets, distress inks and lots, lots more!!!  Its free - just come along anytime between 10:00am and 4:00pm and enjoy!! :o) !!
 While I'm here posting I thought I'd show you two father's day cards I made using things I'd forgotten I had (don't we all do that!!)  This one is from my children to my father-in-law and I used the Flippin' Men range of stamps "Football" Click Here for availability, I coloured him with promarkers but just used the "Warm Grey" range giving the image an old fashioned feel - I stamped out the border three times, coloured it in then punched the circles out (green 1" woodware punch) to make a background.  I computer generated the sentiment and then punched it out (yellow 1.5" woodware punch)
Hope you like it :o)

The second one is for my father-in-law again but this time from my hubby and me - this time I used the Jayne Netley Mayhew animal CD Rom Click Here for availability - I isolated an image (see tutorial HERE for a step by step guide), I then printed 4 copies and cut them out using a nestabilitie shape gradually getting smaller to make my own pyramage.  The papers were printed out from the CD as well onto pearl paper.
Keep watching as I am going to post a tutorial on how to make this type of pyramage soon!!


Thanks for looking and hope to see you all at the Demo on Saturday :o)
By the way if any crafting goodies I use are not in stock just give the shop a ring on 01268 730234 and we will be more than happy to order them in for you and post them out if you don't live locally
Ta Ta for Now xx

Monday, 7 June 2010

TUTORIALS - HOW TO ISOLATE AN IMAGE IN A PDF DOCUMENT PLUS A FREEBIE!!!

Hello Everyone
Hope you all had a good weekend. I've "officially" got a week off this week as I'm having my new kitchen fitted but ... I'm sitting in the lounge with no water, no kitchen and a craft area that looks like a dump site so I thought i'd post this tutorial I prepared last week to show you how to isolate an image from a PDF document - this works well with CD Roms that open up as a PDF i.e. Joanna Sheen -i've also given you a FREEBIE of some wording sentiments - you could print the page out as a whole or follow these instructions to just print out the sentiment you would like to work with. So ......
Firstly
Open up your pdf document
At the top on the toolbar you need to make sure to have a “snapshot tool” (this is a picture of a camera)
– if you don’t see it - simply click “Tools” then "customise toolbars"
this will open a new window - scroll down to almost the bottom and you need to “tick” the box next to “snapshot tool” – click ok - this will add it to your tool bar.
Now click on the snapshot tool (camera) – as you move your mouse around the document you will see that it has changed to a cross “ + “
Position this cross at the top left of the image you want to isolate – keep the left click of your mouse depressed and “drag” it over the image – it will turn blue – as you release the mouse a new window will pop up and it will say “the selected area has been copied” – click ok
Click back on the document and this will get rid of the blue square.
Now open up whatever programme you use to print out from i.e. Microsoft word, right click and then click paste.
You now have your "isolated one image" and just print as you would normally

So .... give it a go and try it with this freebie - a collection of sentiment meanings
These also look great if you cut them out with nestabilities to make a shaped greeting


Hope you find this useful and please please let me know what you think, leave me a comment below :o) xx

Thursday, 6 May 2010

TUTORIALS - NESTABITLIES SHAPED / EASEL CARDS

So here we are with another tutorial - I do hope these are helpful to you - I know I have a lot of fun doing them!!
Before I start I must pay homage to Sharon - this was something she did on one of her classes and I fell in love with it - so all credit to her xx
The first one is simply using your nestabilities to cut a shape from an already pre-scored card. This enables you to mat and layer on your card using the smaller sizes of the nestabilities shape you have chosen.
Please scroll down to the very bottom of this post as an Easel Card version follows these instructions .... and you don't want to miss that do you!!


So ... first of all gather together your "tools" you will need


A die cutting machine, low tack tape, nestabilites shapes, pre-scored cards, a bone folder and some double sided tape.  For this particular card I used "curved rectangles" (Click Here for stock availability) and so I needed a 7x5 pre-scored card.

Place your nestabilites shape you have chosen cutting edge downwards onto the folded card leaving a small gap to the fold so that the whole shape isn't cut and secure with low tack tape


Turn your card the other way up so that the nestabilities shape is underneath the card with cutting side now facing up and cut - (if you are using a Cuttlebug the order is A Plate, C Plate, nestabilities face upwards with card face downwards then B Plate)
 

run through once and then run back again towards you (giving it a double cut) - with some die cutting machines the pressure on the roller can be slightly uneven - and mine is no exception - as you can see it has cut deeper to the right than the left

- this is easily remedied by simply turning the plate around and running it through again.

 
You now have your shaped nestabilities card

Next gather together what you want to use to decorate and finish your card
I have chosen some die cut decoupage, complimentary blue card, adhesive pearls, ribbon, stickles and flowers

I have cut the next two smaller sizes down in the blue card 

I have then cut a small amount off of the left hand side to make it straight - this is necessary so that when you mat and layer your card the straight edge will line up against the fold of your card


Now just finish off your card with the embellishments you have chosen


Here is an alternate version I thought I'd show you this time using Labels Two (Click Here for stock availability) and using a tent fold so that the card opens the other way


Now ..... to take it one step further and make an easel card you follow the same principle


Place your chosen nestabilities shape face down on your pre-scored card and secure with low tack tape - in this instance I have used Scallop Circles (Click Here for stock availability), and cut, using the same procedure as before
You will also need to cut an extra single scallop circle

You will then need to fold back the lower scallop on itself
So it now looks like this - this is the support for the "easel"


On the single scallop apply double sided tape to the BACK OF THE LOWER HALF of the shape - you are going to stick this to the folded over scallop


This forms the basis of your card - all you need to do now is decorate and finish it with your chosen embellishments


I have cut two smaller classic circles (Click Here for stock availability) from complimentary card


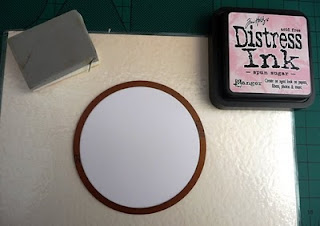
I left the white card inside the circle and distressed the inner with Spun Sugar Distress Ink (one of the new colours) Click Here for stock availability with some cut n dry foam this gives you a white "rim"


I then stamped a butterfly from "gem stone insects" a clear stamp set from Inkadinkado click here for stock availability again with Spun Sugar Distress Ink, and cut another circle from pink spot card  - so I now have three circles, one of the pink spotty ones I have trimmed an edge to leave it straight - this is so it will fit inside the card easier.


I then mounted the butterfly image onto the top of the card

To make the "stopper" for the easel I decided to stamp a greeting and cut it out using the smaller circle and scallop circle nestabilities and using the same technique as before inking the circle to leave a white rim.

I then decorated the greeting and the butterfly with silver sequins


And here is the finished card!!


Thank for for staying with  me through this "long" tutorial but I have tried to be as precise as possible with lots of pictures so that you can see step by step how to achieve this lovely cards - I hope you have a go as they really are easy once you get the hang of them.  If you do make some, post them on your blog and leave me a link in the comments and I will pop across and have a look - I would love to see what you do.
If you live nearby pop your finished cards into the shop so we can all see what you've done.
I'm going to have a rest now!!!
Lots of Love and see you soon :o) xx